Effective Oral Care: Master Gargling, Throat Swabbing & Direct Liquid Application in Indian Nursing
Comprehensive Guide for Nursing Excellence in Oral Care Procedures
Table of Contents
Introduction to Oral Care Excellence
Why Master These Oral Care Procedures?
Effective oral-care procedures are fundamental nursing skills that directly impact patient outcomes, comfort, and recovery. In Indian healthcare settings, where diverse patient populations and varying resource availability present unique challenges, mastering these techniques becomes even more critical. These procedures form the backbone of preventive care, therapeutic interventions, and patient comfort measures.
Prevention Focus
Prevent oral infections, maintain hygiene, and reduce complications through proper oral-care techniques.
Patient Comfort
Enhance patient experience through gentle, effective oral-care procedures that prioritize comfort.
Professional Excellence
Demonstrate competency in essential nursing skills through evidence-based oral-care practices.
Learning Objectives
- Master the technical aspects of gargling, throat swabbing, and direct liquid application
- Understand anatomical considerations for effective oral-care delivery
- Implement safety protocols and infection control measures
- Adapt procedures for diverse patient populations in Indian healthcare settings
- Troubleshoot common challenges and optimize patient outcomes
Anatomy & Physiology Overview
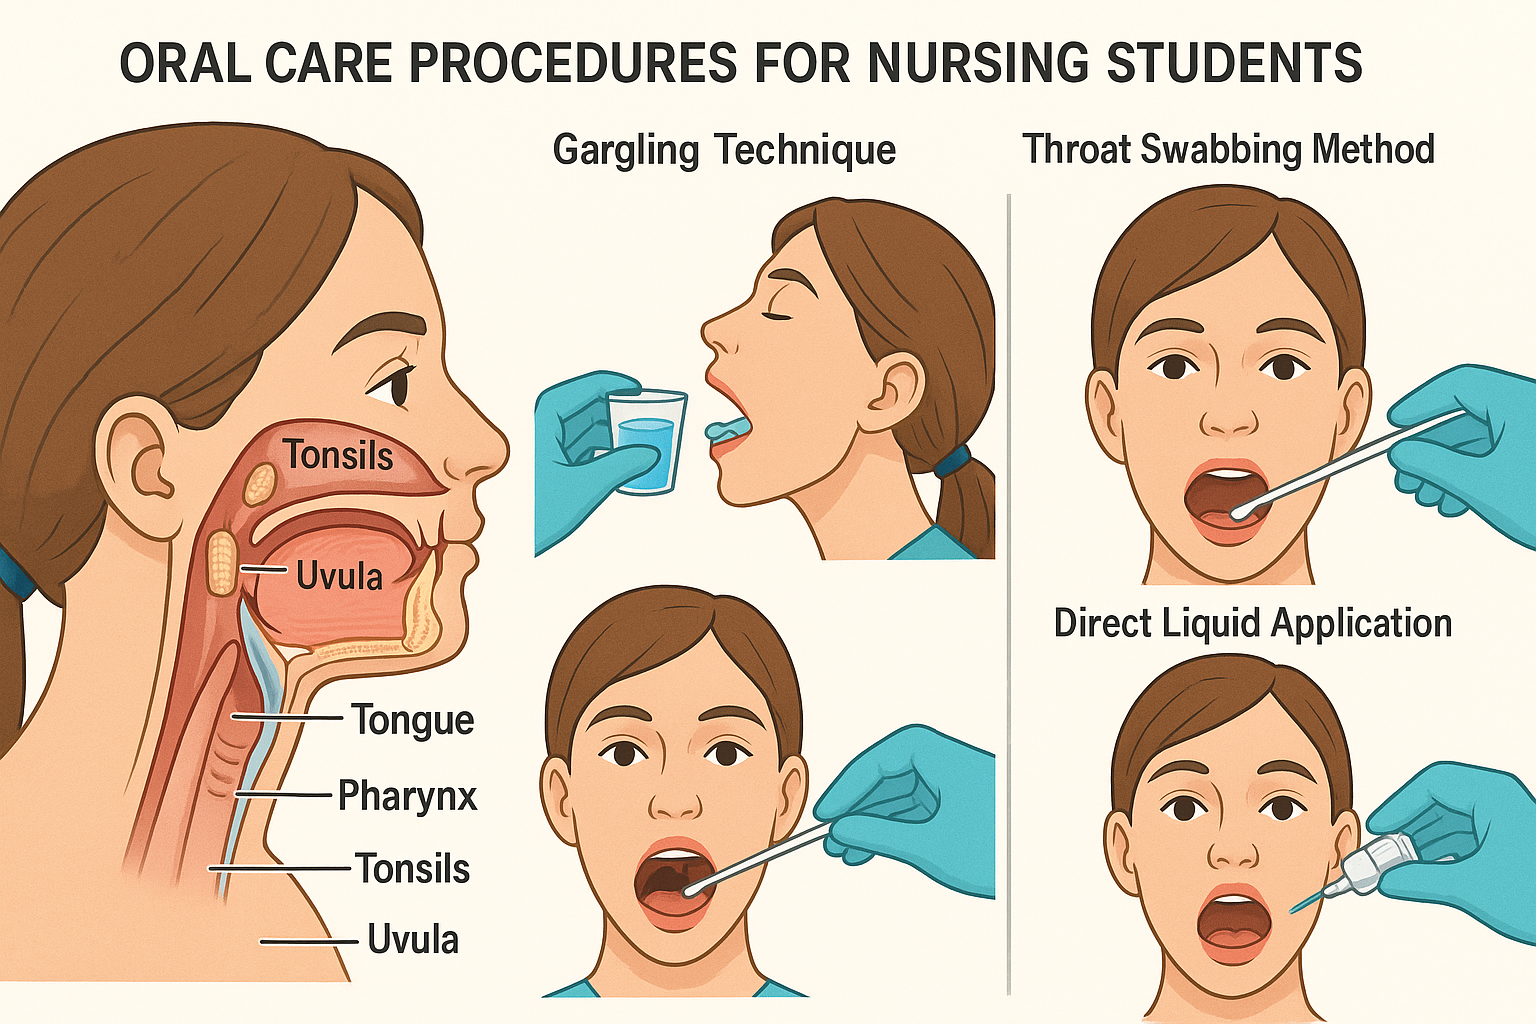
Anatomical overview of oral structures relevant to oral-care procedures
Key Anatomical Structures
Oral Cavity Components
- Lips: Entry point for liquid medications and gargling solutions
- Teeth: Natural barriers requiring careful navigation during procedures
- Tongue: Mobile structure that can aid or hinder oral-care delivery
- Hard Palate: Roof of mouth providing structural support
- Soft Palate: Flexible posterior portion affecting swallowing
Pharyngeal Regions
- Nasopharynx: Upper throat region connected to nasal cavity
- Oropharynx: Middle throat region, primary target for oral-care
- Hypopharynx: Lower throat region, critical for swallowing
- Tonsils: Lymphatic tissue requiring gentle handling
- Uvula: Central hanging structure in soft palate
Physiological Considerations
Gag Reflex Mechanism
The gag reflex is a protective mechanism triggered by stimulation of the posterior pharynx, soft palate, or base of tongue. Understanding trigger points is crucial for successful oral-care administration without causing patient distress.
Saliva Production & Function
Saliva contains enzymes, antibodies, and maintains oral pH. Conditions affecting saliva production (xerostomia) require modified oral-care approaches and increased attention to hydration and lubrication.
Swallowing Coordination
The swallowing process involves precise coordination between oral, pharyngeal, and esophageal phases. Disruption at any level affects oral-care procedure success and patient safety.
Memory Aid: MOUTH Mnemonic for Anatomical Assessment
Mucosa condition
Oral structures
Uvula position
Tongue mobility
Hygiene status
Gargling Procedures Mastery
Understanding Gargling Mechanism
Gargling is a therapeutic oral-care technique that involves holding liquid in the mouth and throat while creating controlled vibrations through air movement. This process distributes medication, cleanses surfaces, and provides mechanical debridement of loose debris and pathogens.
Clinical Insight: The effectiveness of gargling depends on solution contact time, temperature, concentration, and patient technique compliance.
Step-by-Step Gargling Procedure
Pre-procedure Assessment & Preparation
Assess patient ability to gargle safely, check for contraindications, prepare appropriate solution at correct temperature (room temperature or slightly warm).
Patient Positioning & Education
Position patient upright (90 degrees if possible), explain procedure, provide emesis basin, ensure privacy and comfort.
Solution Administration
Provide 15-30ml of solution, instruct patient to take small sip first, then full amount. Monitor for any immediate adverse reactions.
Gargling Technique Guidance
Instruct: tilt head back slightly, create gentle bubbling sound, maintain 15-30 seconds duration, avoid swallowing unless specifically indicated.
Post-procedure Care
Allow patient to spit into basin, provide tissues, assess tolerance, document procedure and patient response, clean equipment.
Contraindications
- • Altered consciousness
- • Dysphagia or swallowing difficulties
- • Severe gag reflex
- • Recent oral/throat surgery
- • Uncontrolled bleeding
- • Severe respiratory distress
Common Solutions
- • Normal saline (0.9% NaCl)
- • Warm salt water (1 tsp/250ml)
- • Antiseptic solutions (diluted)
- • Medicated mouthwashes
- • Bicarbonate solutions
- • Prescribed analgesics
Success Indicators
- • Patient tolerates procedure well
- • No aspiration or choking
- • Adequate solution contact time
- • Visible debris removal
- • Patient comfort maintained
- • Therapeutic goals achieved
Gargling Solutions Reference Guide
| Solution Type | Concentration | Primary Indication | Duration | Special Notes |
|---|---|---|---|---|
| Normal Saline | 0.9% NaCl | General cleansing, post-surgical care | 15-30 seconds | Safe for frequent use, isotonic |
| Salt Water | 1 tsp/250ml | Sore throat, minor wounds | 20-30 seconds | Natural antimicrobial properties |
| Chlorhexidine | 0.12-0.2% | Antiseptic, plaque control | 30 seconds | May stain teeth, avoid alcohol-based |
| Hydrogen Peroxide | 1.5-3% | Debris removal, ulcers | 15 seconds max | Dilute properly, foaming action |
| Bicarbonate | 1 tsp/250ml | pH balancing, fungal infections | 20-30 seconds | Alkalizing effect, taste considerations |
Memory Aid: GARGLE Technique Reminder
Gentle tilt back
Adequate volume
Rhythmic bubbling
Good duration
Let patient control
Evaluate response
Throat Swabbing Techniques
Purpose & Applications
Throat swabbing is a precise oral-care technique used for diagnostic specimen collection, targeted medication application, and removal of specific debris or secretions. This procedure requires excellent technique to ensure sample integrity while maintaining patient comfort and safety.
Diagnostic Uses
- • Culture collection
- • Rapid antigen tests
- • Viral detection
Therapeutic Uses
- • Topical medications
- • Antiseptic application
- • Secretion removal
Critical Safety Considerations
- Use sterile technique for diagnostic samples to prevent contamination
- Avoid excessive pressure to prevent tissue trauma or bleeding
- Minimize gag reflex stimulation through proper positioning
Equipment & Materials
Essential Items
- • Sterile cotton swabs or specialized throat swabs
- • Tongue depressor (if visualization needed)
- • Adequate lighting source or penlight
- • Personal protective equipment (gloves, mask, eye protection)
- • Specimen transport medium (for cultures)
Optional Support Items
- • Emesis basin for patient comfort
- • Tissues for post-procedure care
- • Topical anesthetic (if ordered)
- • Additional swabs for multiple samples
Patient Selection Criteria
Ideal Candidates
- • Cooperative patients
- • Normal gag reflex
- • Stable vital signs
- • Clear consciousness
Requires Caution
- • Bleeding disorders
- • Recent throat surgery
- • Severe anxiety
- • Airway compromise
Comprehensive Throat Swabbing Procedure
Pre-Procedure Phase
Confirm correct patient, procedure indication, and any special instructions. Check for allergies or contraindications.
Collect all necessary materials, verify expiration dates, and perform thorough hand hygiene before donning gloves.
Explain procedure, expected sensations, and patient’s role. Obtain verbal consent and address any concerns or questions.
Execution Phase
Seat patient upright, ensure adequate lighting, use tongue depressor if needed to visualize posterior pharynx clearly.
Insert swab carefully, avoid teeth and tongue, target posterior pharynx and tonsillar areas. Rotate gently for 10-15 seconds.
Remove swab without touching other oral structures, place in transport medium immediately, label correctly.
Post-Procedure Care & Documentation
Patient Assessment
Monitor for discomfort, bleeding, or adverse reactions. Provide tissues and comfort measures as needed.
Documentation
Record procedure details, patient tolerance, specimen characteristics, and transport information.
Specimen Handling
Ensure proper labeling, transport conditions, and timely delivery to laboratory for processing.
Common Challenges & Solutions
Challenge: Excessive Gag Reflex
Solution:
- • Use distraction techniques (ask patient to breathe through nose)
- • Apply topical anesthetic if ordered and appropriate
- • Work quickly but gently, avoid unnecessary contact with trigger areas
- • Consider alternative sampling methods if severe
Challenge: Poor Visualization
Solution:
- • Improve lighting with additional sources or repositioning
- • Use tongue depressor more effectively to retract tongue
- • Ask patient to say “ahh” to lower tongue and elevate soft palate
- • Consider asking for assistance with patient positioning
Challenge: Contaminated Sample
Solution:
- • Maintain sterile technique throughout procedure
- • Avoid contact with teeth, tongue, or lips during insertion/removal
- • Use fresh swab if contamination occurs
- • Document any procedural difficulties that might affect results
Memory Aid: SWAB Technique Excellence
Sterile approach
Maintain aseptic technique
Witness clearly
Good visualization essential
Avoid contamination
Target area precisely
Brief but thorough
Quick, effective collection
Direct Liquid Application Methods
Understanding Direct Application Techniques
Direct liquid application represents the most precise form of oral-care delivery, allowing targeted medication or treatment solution placement to specific oral and pharyngeal areas. This technique requires exceptional skill, anatomical knowledge, and patient cooperation to achieve therapeutic goals while maintaining safety and comfort.
Precision Delivery
Targeted application to specific lesions, wounds, or anatomical structures for maximum therapeutic effect.
Controlled Dosing
Accurate measurement and delivery of prescribed amounts, minimizing waste and ensuring therapeutic levels.
Enhanced Contact
Prolonged contact time with target tissues through precise placement and patient positioning.
Syringe-Based Application
Technique Overview
Uses oral syringes (without needles) for precise volume control and targeted delivery. Ideal for liquid medications, wound irrigations, and antiseptic applications requiring accuracy.
Step-by-Step Process
- 1 Select appropriate syringe size (1-10ml) based on volume needed
- 2 Draw up exact volume, remove air bubbles carefully
- 3 Position patient for optimal access and drainage
- 4 Insert syringe tip carefully, avoiding tissue trauma
- 5 Apply gentle, steady pressure for controlled delivery
- 6 Withdraw slowly, maintain patient positioning briefly
Safety Note: Never use syringes with attached needles for oral applications. Always use oral-specific syringes to prevent injury.
Aspiration Prevention
- Position head slightly forward to promote natural drainage
- Use small volumes (0.5-2ml) per application attempt
- Allow patient to swallow or expectorate between applications
- Monitor for coughing, choking, or respiratory distress
Applicator-Based Methods
Cotton-Tipped Applicators
Ideal for viscous medications, antiseptic applications, and precise topical treatments. Provides excellent control for small area coverage.
Advantages
- • Precise application control
- • Minimal waste of medication
- • Gentle tissue contact
- • Easy to manipulate
Limitations
- • Limited volume capacity
- • Requires multiple applications
- • Cotton fibers may remain
- • Not suitable for thin liquids
Foam Applicators
Specialized applicators with foam tips for gentle application of solutions to sensitive tissues, particularly useful in post-surgical or compromised oral environments.
Best Practice Applications
- • Topical analgesics for ulcers or lesions
- • Antifungal medications for thrush treatment
- • Antiseptic solutions for wound care
- • Moisturizing agents for dry mucosa
Temperature Considerations
Room Temperature (20-25°C)
Most medications, antiseptics, standard applications
Warm (30-35°C)
Comfort measures, irrigation solutions, some therapeutic applications
Cool (15-20°C)
Pain relief, swelling reduction, some topical anesthetics
Medication-Specific Application Guidelines
| Medication Type | Preferred Method | Volume/Frequency | Special Considerations | Contact Time |
|---|---|---|---|---|
| Topical Analgesics | Cotton applicator | 0.5-1ml, q4-6h | Target specific lesions, avoid healthy tissue | 15-30 minutes |
| Antifungal Solutions | Syringe or foam applicator | 2-5ml, q6h | Cover all affected areas, continue after symptoms resolve | 5-10 minutes |
| Antiseptic Solutions | Syringe irrigation | 5-10ml, q8-12h | Gentle pressure, allow drainage | 1-2 minutes |
| Antibiotic Solutions | Precise syringe placement | 1-3ml, per prescription | Temperature sensitive, complete course essential | 10-15 minutes |
| Local Anesthetics | Cotton-tipped precise application | 0.2-0.5ml, PRN | Onset time 2-5 minutes, maximum dose awareness | 20-30 minutes |
| Moisturizing Agents | Foam or cotton applicator | 1-2ml, q2-4h PRN | Focus on dry areas, avoid oversaturation | Until absorbed |
Optimal Patient Positioning for Direct Application
Upright Position
- Best for: Most liquid applications, routine medications
- Angle: 90 degrees upright, feet flat on floor
- Advantages: Natural drainage, patient comfort, easy access
- Avoid if: Dizziness, weakness, nausea present
Semi-Fowler’s Position
- Best for: Compromised patients, post-surgical cases
- Angle: 30-45 degrees elevation, head supported
- Advantages: Reduced aspiration risk, good visualization
- Monitor: Patient stability, comfort level
Side-Lying Position
- Best for: Unconscious patients, drainage procedures
- Position: Affected side down, head supported
- Advantages: Gravity-assisted drainage, airway protection
- Caution: Limited access, requires repositioning
Memory Aid: DIRECT Application Protocol
Dose accurately
Measure precisely
Identify target
Locate application site
Reach carefully
Gentle approach
Execute smoothly
Controlled delivery
Contact maintained
Adequate duration
Track response
Monitor outcomes
Safety Protocols & Risk Management
Critical Safety Framework
Safety in oral-care procedures requires systematic risk assessment, proactive prevention strategies, and immediate response protocols. Every procedure must be evaluated for individual patient risk factors, environmental conditions, and procedural complexity before initiation.
Universal Safety Principles
- • Patient safety takes absolute priority over procedure completion
- • Never proceed if patient shows signs of distress or non-cooperation
- • Maintain continuous assessment throughout procedure
- • Have emergency equipment and protocols immediately available
Pre-Procedure Risk Assessment
Patient Factors
- • Consciousness level and cooperation ability
- • Gag reflex sensitivity and swallowing function
- • Respiratory status and airway patency
- • Previous adverse reactions to oral procedures
- • Current medications affecting bleeding or sedation
- • Anatomical variations or surgical history
Environmental Factors
- • Adequate lighting and visibility
- • Proper patient positioning capabilities
- • Emergency equipment accessibility
- • Suction availability and functionality
- • Staff competency and experience level
- • Communication systems for assistance
Absolute Contraindications
- Unconscious patient without protective reflexes
- Active bleeding in oral cavity
- Severe respiratory distress
- Patient refusal or extreme agitation
- Recent major oral surgery (< 24 hours)
Relative Contraindications
- Severe nausea or vomiting
- Dysphagia or swallowing difficulties
- Coagulation disorders
- Extreme anxiety or panic disorder
- Oral lesions with unknown etiology
Emergency Equipment
- Portable suction unit with multiple tips
- Oxygen delivery system
- Emergency medications (epinephrine)
- Airway management devices
- Emergency call system access
Emergency Response Protocols
Aspiration Emergency
Immediate Actions (0-60 seconds)
- • Stop procedure immediately
- • Position patient head down, on side
- • Activate emergency suction
- • Call for assistance
Secondary Response (1-5 minutes)
- • Assess breathing and pulse
- • Administer oxygen if needed
- • Prepare for advanced airway management
- • Document incident thoroughly
Allergic Reaction
Recognition Signs
- • Localized swelling or rash
- • Difficulty breathing or swallowing
- • Hives or generalized itching
- • Blood pressure changes
Response Protocol
- • Discontinue causative agent
- • Rinse mouth thoroughly
- • Administer antihistamines as ordered
- • Monitor for anaphylaxis signs
Excessive Bleeding
Control Measures
- • Apply direct pressure with sterile gauze
- • Elevate patient’s head
- • Use cold compresses if appropriate
- • Assess bleeding source and severity
Escalation Criteria
- • Continuous bleeding > 10 minutes
- • Signs of hemodynamic instability
- • Patient anxiety or panic
- • Difficulty visualizing bleeding source
Safety Documentation Requirements
Pre-Procedure Documentation
- Risk assessment completion and findings
- Patient consent obtained and witnessed
- Equipment checks and emergency preparedness
- Contraindication screening results
- Staff competency verification
Post-Procedure Documentation
- Procedure completion status and outcomes
- Patient tolerance and response assessment
- Any complications or adverse events
- Follow-up care requirements
- Patient education provided
Memory Aid: SAFETY First Protocol
Screen risks
Assess contraindications
Assess patient
Continuous monitoring
Facilities ready
Emergency equipment
Execute carefully
Gentle technique
Track responses
Monitor reactions
Yield if necessary
Stop when unsafe
Infection Control Measures
Infection Prevention in Oral Care
Effective infection control in oral-care procedures is paramount for patient safety and healthcare worker protection. The oral cavity harbors numerous microorganisms, making strict adherence to infection prevention protocols essential for preventing healthcare-associated infections and cross-contamination between patients.
Key Principle: Every oral-care procedure should be approached with the assumption that all patients may harbor infectious organisms, requiring universal precautions and consistent application of infection control measures.
Hand Hygiene Excellence
Hand hygiene remains the single most effective measure for preventing infection transmission. Proper technique and timing are critical for oral-care procedure success.
When to Perform Hand Hygiene
- • Before patient contact
- • Before clean/aseptic procedure
- • After body fluid exposure risk
- • After patient contact
- • After patient environment contact
Technique Requirements
- • Alcohol-based rub: 20-30 seconds minimum
- • Soap and water: 40-60 seconds minimum
- • Cover all hand surfaces completely
- • Pay special attention to fingertips, thumbs
- • Allow hands to air dry completely
Personal Protective Equipment
Appropriate PPE selection and use creates barriers between healthcare workers and potentially infectious materials during oral-care procedures.
Gloves
Non-sterile for routine procedures, sterile for invasive procedures. Change between patients and when contaminated.
Face Protection
Surgical mask minimum, face shield for splash risk, N95 for airborne precautions.
Protective Clothing
Fluid-resistant gowns for splash risk, aprons for routine care, change when visibly soiled.
Eye Protection
Safety glasses or face shields when splash or spray generation is possible.
Equipment Sterilization & Disinfection
Critical Items (Contact with Sterile Tissue)
Require sterilization
- • Surgical instruments
- • Items entering sterile body cavities
- • Biopsy forceps
Semi-Critical Items (Contact with Mucous Membranes)
Require high-level disinfection
- • Reusable syringes (oral use)
- • Throat examination tools
- • Suction tips
Non-Critical Items (Contact with Intact Skin)
Require low-level disinfection
- • Blood pressure cuffs
- • Stethoscopes
- • Patient furniture
Waste Management Protocols
Infectious Waste
- • Blood-soaked materials
- • Used swabs and applicators
- • Contaminated PPE
- • Sharps containers
Regular Waste
- • Paper towels (clean)
- • Packaging materials
- • Non-contaminated items
- • Administrative materials
Disposal Guidelines
- • Segregate waste at point of generation
- • Use appropriate color-coded containers
- • Never overfill waste containers
- • Follow institutional disposal schedules
Environmental Infection Control Strategies
Air Quality Management
- Maintain appropriate ventilation rates
- Use negative pressure for isolation rooms
- Filter systems for airborne contaminants
- Regular HVAC system maintenance
- Monitor humidity levels (40-60%)
Surface Disinfection
- Clean surfaces before disinfection
- Use EPA-approved disinfectants
- Follow manufacturer contact times
- Focus on high-touch surfaces
- Document cleaning schedules
Water System Safety
- Use sterile water for invasive procedures
- Regular water line maintenance
- Monitor water quality parameters
- Flush lines before patient use
- Use filtration systems when appropriate