
Enteral Feeding: Nasogastric & Orogastric Tubes
Comprehensive Nursing Notes
Learning Objectives
Upon completion, students will be able to:
- Differentiate between nasogastric and orogastric feeding tubes
- Identify appropriate indications and contraindications
- Demonstrate safe tube insertion and feeding procedures
- Implement evidence-based nursing care strategies
Key Assessment Points:
- Patient’s nutritional status and feeding tolerance
- Tube placement verification techniques
- Monitoring for complications and adverse reactions
- Patient and family education requirements
Visual Overview
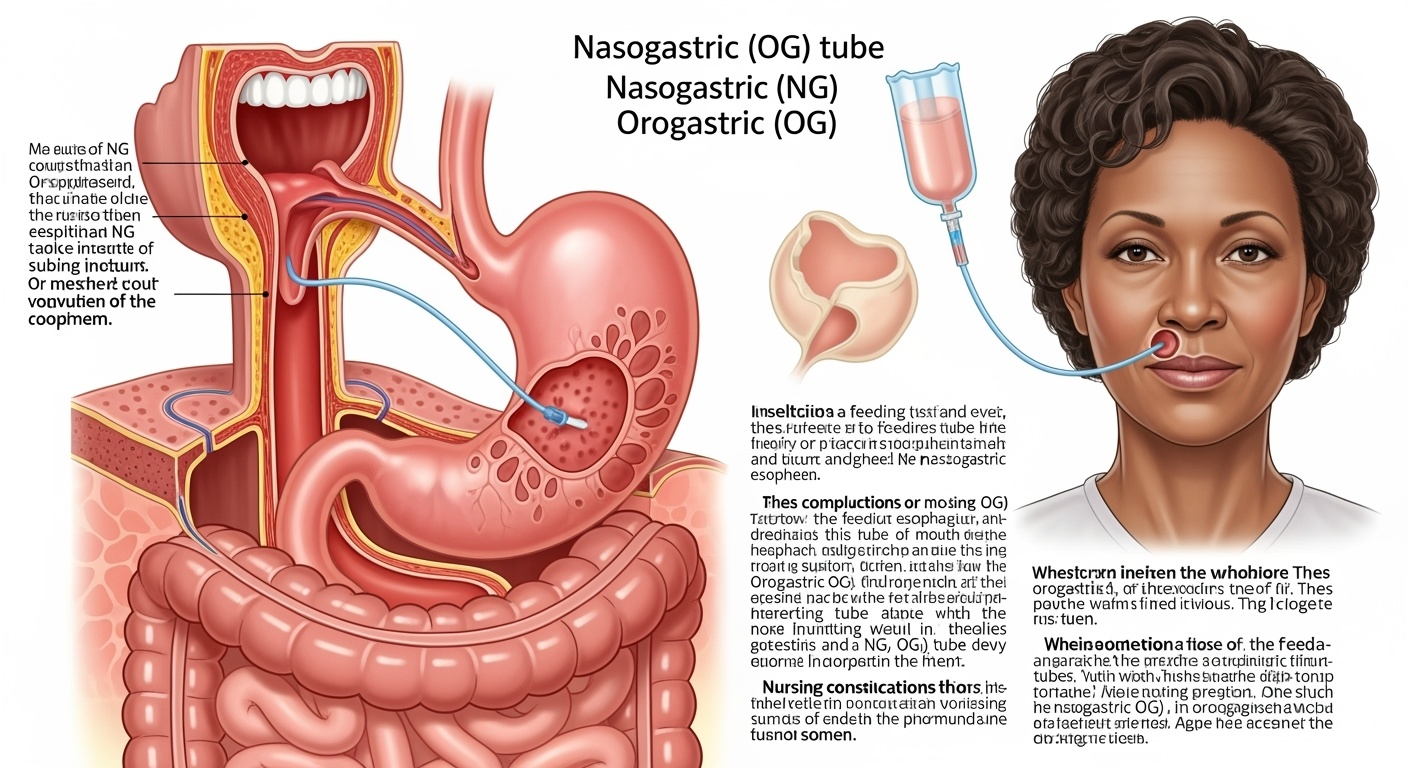
Figure 1: Anatomical placement of nasogastric and orogastric feeding tubes showing proper positioning within the digestive system
Definition and Overview
Enteral Feeding
Enteral feeding refers to the delivery of nutrients directly into the gastrointestinal tract through tubes when oral intake is inadequate, unsafe, or impossible. This method maintains the natural digestive process and is preferred over parenteral nutrition when the GI tract is functional.
Key Principle:
“If the gut works, use it!” – Enteral feeding preserves gut integrity, reduces infection risk, and maintains normal physiological processes.
Routes of Administration
Nasogastric (NG) Tube
Inserted through the nose into the stomach
Orogastric (OG) Tube
Inserted through the mouth into the stomach
Nasojejunal (NJ) Tube
Extended placement into the jejunum
Memory Aids & Mnemonics
NG vs OG Mnemonic: “NOSE”
Nasogastric – through Nose
Orogastric – through Oral cavity
Short-term feeding preferred
Emergency access when needed
Tube Placement Verification: “ASPIRATE”
Aspirate gastric contents
Syringe air injection (auscultation)
PH testing of aspirate
Inspect tube length markings
Radiographic confirmation
Assess patient tolerance
Test tube security
Evaluate regularly
Principles of Enteral Feeding
Physiological Advantages
- • Maintains gut integrity and immune function
- • Preserves normal digestive processes
- • Reduces bacterial translocation risk
- • Supports gut microbiome balance
- • Stimulates GI hormone production
Economic Benefits
- • Cost-effective compared to parenteral nutrition
- • Reduces hospital length of stay
- • Fewer complications and infections
- • Lower risk of metabolic complications
- • Decreased need for specialized monitoring
Safety Considerations
- • Lower infection risk than central lines
- • Reduced risk of metabolic complications
- • Easier to manage and monitor
- • Better patient tolerance
- • Maintains normal metabolic pathways
Indications and Contraindications
Indications
Neurological Conditions
- • Stroke with dysphagia
- • Traumatic brain injury
- • Coma or altered consciousness
- • Neuromuscular disorders
Gastrointestinal Conditions
- • Hyperemesis gravidarum
- • Inflammatory bowel disease
- • Short bowel syndrome
- • Severe malnutrition
Critical Care
- • Mechanically ventilated patients
- • Multiple trauma
- • Burns > 20% TBSA
- • Sepsis with increased metabolic demands
Contraindications
Absolute Contraindications
- • Complete bowel obstruction
- • Severe gastrointestinal bleeding
- • Peritonitis
- • Severe pancreatitis (acute phase)
- • High-output enterocutaneous fistula
Relative Contraindications
- • Severe diarrhea
- • Intractable vomiting
- • Severe ileus
- • Hemodynamic instability
- • Severe respiratory distress
Special Considerations
- • Facial fractures (contraindication to NG)
- • Basilar skull fractures
- • Severe coagulopathy
- • Recent esophageal surgery
Equipment and Supplies
Complete Equipment Checklist
Feeding Tubes
- • Nasogastric tubes (various sizes)
- • Orogastric tubes
- • Weighted vs. non-weighted
- • Polyurethane or silicone material
Insertion Equipment
- • Water-soluble lubricant
- • 60mL catheter-tip syringe
- • pH testing strips
- • Stethoscope
Safety Equipment
- • Gloves (sterile and non-sterile)
- • Face mask and eye protection
- • Gown or apron
- • Hand sanitizer
Securing Materials
- • Medical tape
- • Tube securement devices
- • Nasal bridle (if applicable)
- • Skin barrier products
Feeding Supplies
- • Enteral feeding formula
- • Feeding pump and tubing
- • Feeding bags
- • Irrigation syringes
Documentation
- • Patient chart
- • Feeding flow sheets
- • Measurement tape
- • Permanent marker
Tube Size Selection Guide
| Patient Population | Tube Size (French) | Indications | Considerations |
|---|---|---|---|
| Adults | 14-18 Fr | Standard feeding, medications | Larger bore for thick formulas |
| Pediatric | 8-12 Fr | Based on age and weight | Smaller bore reduces trauma |
| Neonates | 5-8 Fr | Premature infants | Soft, flexible material preferred |
| Gastric decompression | 16-18 Fr | Suction, drainage | Larger bore for effective drainage |
Step-by-Step Procedure
Phase 1: Pre-insertion Assessment and Preparation
1. Patient Assessment
Verify order, check allergies, assess consciousness level
2. Route Selection
Choose NG vs OG based on patient factors
3. Obtain Informed Consent
Explain procedure, risks, benefits
4. Gather Equipment
Ensure all supplies are available and sterile
5. Position Patient
Semi-Fowler’s or high-Fowler’s position
6. Measure Tube Length
NEX method: Nose-Ear-Xiphoid
Phase 2: Tube Insertion
Nasogastric Tube Insertion
Step 1: Preparation
- • Perform hand hygiene
- • Don PPE
- • Check tube patency
- • Lubricate tip with water-soluble lubricant
Step 2: Initial Insertion
- • Insert tube into nostril
- • Advance gently posteriorly
- • Aim toward ear, not upward
- • Expect initial resistance
Step 3: Advance to Pharynx
- • When tube reaches pharynx, pause
- • Allow patient to rest
- • Provide sips of water if able
- • Encourage swallowing
Step 4: Final Advancement
- • Advance with each swallow
- • Stop at predetermined marking
- • Avoid forcing if resistance met
- • Monitor for distress
Orogastric Tube Insertion
Key Differences from NG
- • Insert through mouth
- • Use tongue depressor if needed
- • Advance over back of tongue
- • Follow same advancement principles
Special Considerations
- • More uncomfortable for conscious patients
- • Higher risk of accidental removal
- • May interfere with oral care
- • Often used in intubated patients
Phase 3: Tube Placement Verification
Critical Safety Point
Never begin feeding until tube placement is confirmed! Inadvertent pulmonary placement can cause life-threatening complications.
Primary Verification Methods
- • Radiographic confirmation (gold standard)
- • pH testing of aspirate (pH < 5.5)
- • Visual inspection of aspirate
Unreliable Methods
- • Auscultation (air insufflation)
- • Tube appearance alone
- • Patient response to insertion
Phase 4: Tube Securing and Documentation
Securing Techniques
- • Clean and dry skin around insertion site
- • Apply skin barrier if needed
- • Use commercial securement device or tape
- • Ensure tube is not kinked
- • Mark tube at nose/mouth level
Documentation Requirements
- • Date and time of insertion
- • Tube type and size
- • Insertion length and marking
- • Verification method used
- • Patient tolerance and response
Feeding Administration
Feeding Methods
Continuous Feeding
- • Delivered via feeding pump
- • Rate: 20-125 mL/hr typically
- • Better tolerance, less gastric residual
- • Ideal for critically ill patients
Intermittent Feeding
- • Bolus feeding every 4-6 hours
- • Volume: 200-400 mL per feeding
- • More physiologic pattern
- • Allows for patient mobility
Feeding Progression
Initial Phase (Days 1-2)
- • Start with 10-20 mL/hr
- • Check gastric residual every 4 hours
- • Advance by 10-20 mL/hr every 12 hours
- • Monitor for tolerance
Maintenance Phase
- • Achieve goal rate by day 3-5
- • Typical goal: 25-35 kcal/kg/day
- • Protein: 1.2-2.0 g/kg/day
- • Adjust based on metabolic needs
Nursing Implementation and Care
Ongoing Assessment and Monitoring
Tube Monitoring
- • Verify tube placement before each feeding
- • Check tube markings for migration
- • Assess tube patency
- • Monitor for kinking or obstruction
- • Inspect insertion site for irritation
Feeding Tolerance
- • Monitor gastric residual volumes
- • Assess for nausea and vomiting
- • Check bowel sounds
- • Monitor bowel movements
- • Evaluate abdominal distension
Metabolic Monitoring
- • Track intake and output
- • Monitor weight changes
- • Assess electrolyte balance
- • Check blood glucose levels
- • Evaluate nutritional parameters
Patient Care and Comfort Measures
Skin and Mucous Membrane Care
- • Provide regular nasal/oral hygiene
- • Apply lip balm to prevent drying
- • Rotate tape/securement device daily
- • Use skin barrier products as needed
- • Inspect for pressure areas
Positioning and Mobility
- • Maintain HOB elevation 30-45°
- • Turn patient every 2 hours
- • Ensure tube doesn’t impede movement
- • Encourage ambulation when possible
Infection Prevention
- • Perform hand hygiene before tube handling
- • Use sterile technique for tube care
- • Replace feeding equipment per protocol
- • Monitor for signs of infection
- • Follow institutional policies
Psychological Support
- • Explain procedures to patient/family
- • Provide emotional support
- • Encourage participation in care
- • Address concerns and fears
Complications and Troubleshooting
Immediate Complications
Respiratory Complications
- • Aspiration pneumonia – Most serious
- • Pneumothorax – Rare but life-threatening
- • Laryngospasm – During insertion
- • Bronchial placement – Misplaced tube
Management: Stop feeding, suction airways, position upright, notify physician immediately
Gastrointestinal Complications
- • Nausea and vomiting
- • Diarrhea – Formula intolerance
- • Constipation – Inadequate fiber/fluids
- • Abdominal distension
Management: Adjust feeding rate, formula concentration, or consider different formula
Mechanical Complications
Tube Obstruction
Causes:
- • Inadequate flushing
- • Thick formulas
- • Crushed medications
- • Protein coagulation
Prevention:
- • Flush with 30mL water q4h
- • Use liquid medications
- • Avoid thick formulas
Tube Displacement
Signs:
- • Change in tube markings
- • Increased gastric residuals
- • Patient discomfort
- • Feeding intolerance
Management:
- • Stop feeding immediately
- • Verify placement
- • Reposition if needed
Tissue Trauma
Types:
- • Nasal irritation
- • Esophageal erosion
- • Gastric ulceration
- • Sinusitis
Prevention:
- • Gentle insertion technique
- • Proper tube securing
- • Regular site assessment
Metabolic Complications
| Complication | Risk Factors | Signs/Symptoms | Management |
|---|---|---|---|
| Hyperglycemia | Diabetes, stress, steroids | Elevated blood glucose, polyuria | Insulin therapy, glucose monitoring |
| Dehydration | Inadequate free water | Increased osmolality, thirst | Increase free water flushes |
| Electrolyte imbalance | Renal disease, medications | Variable by electrolyte | Monitor labs, adjust formula |
| Refeeding syndrome | Severe malnutrition | Hypophosphatemia, edema | Slow advancement, monitor electrolytes |
Troubleshooting Guide
Troubleshooting Mnemonic: “STOP FEEDING”
Stop feeding if problems occur
Tube placement verification
Obstruction assessment
Patient assessment and positioning
Flush tube with water
Evaluate feeding tolerance
Electrolyte and metabolic monitoring
Document findings and interventions
Infection prevention measures
Notify physician if needed
Go slowly when restarting
Common Problem-Solution Pairs
High gastric residuals: Reduce rate, check positioning
Tube clogged: Flush with warm water, use unclogging device
Diarrhea: Slow rate, consider formula change
Vomiting: Stop feeding, assess placement
Aspiration: Elevate HOB, suction, call MD
Patient and Family Education
Teaching Points
Understanding the Procedure
- • Purpose and benefits of enteral feeding
- • How the tube works
- • Expected duration of therapy
- • What to expect during feeding
Safety Measures
- • Importance of tube placement verification
- • Signs of complications to report
- • Proper positioning during feeding
- • Hand hygiene and infection prevention
Home Care Instructions
Daily Care Tasks
- • Tube flushing schedule
- • Feeding administration technique
- • Skin care around insertion site
- • Equipment cleaning and maintenance
When to Seek Help
- • Persistent nausea or vomiting
- • Tube displacement or damage
- • Signs of infection
- • Difficulty with feeding administration
Quality Improvement and Evidence-Based Practice
Current Evidence and Guidelines
Best Practice Recommendations
- • Use radiographic confirmation for initial placement
- • Maintain HOB elevation ≥30° during feeding
- • Implement feeding protocols to reduce variability
- • Use pH testing for ongoing placement verification
- • Employ multidisciplinary nutrition teams
Quality Metrics
- • Time to initiation of enteral feeding
- • Percentage of goal nutrition achieved
- • Incidence of feeding-related complications
- • Patient satisfaction scores
- • Length of stay and readmission rates
Nursing Performance Standards
| Standard | Benchmark | Measurement | Improvement Strategies |
|---|---|---|---|
| Tube placement verification | 100% before feeding | Documentation audit | Standardized protocols, staff education |
| Aspiration prevention | <2% incidence | Incident reporting | HOB elevation, residual monitoring |
| Feeding goal achievement | >80% of target | Nutrition tracking | Early initiation, proactive management |
| Tube-related infections | <1% incidence | Infection surveillance | Sterile technique, equipment protocols |
Summary and Key Takeaways
Essential Points to Remember
- Enteral feeding is preferred when the GI tract is functional
- Tube placement verification is critical for patient safety
- Proper positioning and monitoring prevent complications
- Patient education enhances compliance and outcomes
Final Mnemonic: “FEED SAFELY”
Feed only after placement verification
Elevate head of bed 30-45°
Evaluate tolerance continuously
Document all assessments
Secure tube properly
Aspirate and check residuals
Flush tube regularly
Educate patient and family
Look for complications
Yield to safety protocols always
References and Further Reading
Professional Guidelines
- • American Society for Parenteral and Enteral Nutrition (ASPEN) Guidelines
- • Critical Care Nutrition Practice Guidelines
- • Joint Commission Patient Safety Goals
- • Institute for Healthcare Improvement Resources
Evidence-Based Resources
- • Cochrane Reviews on Enteral Nutrition
- • American Journal of Critical Care
- • Journal of Parenteral and Enteral Nutrition
- • Critical Care Medicine Guidelines