
Mastering Mobility and Alignment: A Comprehensive Guide for Nursing Students
Introduction: The Cornerstone of Patient Care and Nurse Safety
Mobility is more than just movement; it is a vital sign of life and a critical indicator of health. For patients, the ability to move is intrinsically linked to independence, recovery, and psychological well-being. For nurses, facilitating this movement is a core competency that, when performed correctly, accelerates healing and prevents complications. However, it also presents one of the greatest occupational hazards: musculoskeletal injury. Mastering the principles of body alignment and mobility is therefore not just a task on a checklist—it is a foundational skill that protects both the patient and the provider, forming the bedrock of safe, effective, and compassionate nursing care.
This guide is designed to provide nursing students with a detailed, evidence-based framework for addressing impaired mobility. Aligned with NCLEX standards, it moves from the "why"—the theoretical science of movement—to the "how"—the practical application of the nursing process. Through in-depth explanations, memory aids, and a culminating case study, you will develop the clinical judgment necessary to promote patient mobility safely and effectively, transforming a routine task into a therapeutic art.
Part 1: The 'Why': Foundational Concepts of Mobility and Body Mechanics
Before we can intervene, we must understand the intricate systems we are working with. This section establishes the scientific rationale behind every positioning technique, transfer, and exercise. By grasping the physiology of normal movement and the devastating cascade of problems caused by immobility, your nursing actions become purposeful and evidence-based.
1.1 The Physiology of Movement
Purposeful movement is a symphony conducted by the nervous system, with the musculoskeletal system as its orchestra. It is a complex process that requires the seamless integration of multiple components to achieve a state of dynamic stability.
Core Concepts of Movement
- Mobility: Defined as the ability of a person to change and control their body position. It requires not just muscle power but also energy, skeletal stability, and neuromuscular coordination (WisTech Open).
- Body Alignment (Posture): This is the geometric arrangement of body parts in relation to one another. Correct alignment, whether standing, sitting, or lying, minimizes strain on joints, muscles, and ligaments, promoting optimal function (OpenTextBC).
- Balance: A state of equilibrium is achieved when the body's center of gravity is positioned over its base of support. A lower center of gravity and a wider base of support increase stability.
- Coordinated Movement: This is the smooth, controlled execution of motor tasks, resulting from the balanced and synergistic action of various muscle groups under the direction of the central nervous system.
These elements are not independent; they are deeply interconnected. Poor alignment compromises balance, which in turn restricts coordinated movement, ultimately impairing mobility. As a nurse, your goal is to support and restore this delicate interplay, creating an environment where the body can function as it was designed.
1.2 The Perils of Immobility: A Systems-Based Overview
Immobility is far more than a temporary inconvenience; it is a potent catalyst for physiological decline. When a patient is confined to bed, every major body system is placed under stress, leading to a cascade of preventable complications. Understanding these risks provides the urgent "why" behind every effort to mobilize a patient.
| Body System | Complications of Immobility | Underlying Mechanism |
|---|---|---|
| Cardiovascular | Orthostatic hypotension, increased cardiac workload, deep vein thrombosis (DVT) | Venous stasis from lack of muscle contraction, fluid shifts from legs to the central circulation. |
| Respiratory | Atelectasis (collapsed alveoli), hypostatic pneumonia | Decreased lung expansion due to pressure, pooling of secretions in dependent lung areas. |
| Musculoskeletal | Muscle atrophy, joint contractures, foot drop, bone demineralization (osteoporosis) | Lack of weight-bearing and muscle contraction leads to breakdown of muscle and bone tissue. |
| Integumentary | Pressure injuries (bedsores) | Prolonged pressure on bony prominences impairs blood flow, leading to tissue necrosis. |
| Gastrointestinal | Constipation, decreased appetite | Decreased peristalsis and mobility. |
| Urinary | Urinary stasis, renal calculi (kidney stones), urinary tract infections (UTIs) | Gravity-dependent drainage is impaired, leading to pooling of urine in the bladder and kidneys. |
| Psychological | Depression, anxiety, sensory deprivation, confusion | Loss of independence, social isolation, and lack of environmental stimuli. |
Note: The chart above provides an illustrative representation of the relative risk increase for common complications associated with prolonged immobility, based on established clinical knowledge.
Part 2: The 'How': The Nursing Process for Impaired Mobility
With a firm grasp of the "why," we now turn to the "how." This section provides a systematic, step-by-step guide to managing patients with impaired mobility, structured around the five phases of the nursing process: Assessment, Diagnosis, Planning, Implementation, and Evaluation (ADPIE). This is the practical core of your nursing practice.
2.1 Step 1: Comprehensive Assessment
A thorough assessment is the foundation of a safe and effective mobility plan. It involves gathering both what the patient tells you (subjective data) and what you observe (objective data) to form a complete clinical picture.
Subjective and Objective Data Collection
- Subjective Data:
- Patient's Perception: Ask, "How has your ability to move changed?" or "What activities are you having trouble with?"
- Pain Assessment: Use a 0-10 scale to quantify pain with movement. Note its location, character, and what makes it better or worse (SimpleNursing).
- History of Falls: Inquire about any recent falls, as this indicates a high risk for future incidents.
- Patient Goals: Understand what the patient hopes to achieve. "I want to be able to walk to the bathroom by myself."
- Objective Data:
- Range of Motion (ROM): Observe the patient moving their joints (active ROM) or gently move them yourself if they are unable (passive ROM). Note any limitations, stiffness, or crepitus.
- Muscle Strength: Test major muscle groups (e.g., hand grips, leg pushes) against resistance and grade them on a 0-5 scale (0=No contraction, 5=Full ROM against gravity and full resistance).
- Balance and Gait: Observe the patient's posture while sitting and standing. If safe, ask them to walk a short distance. Note their stability, stride, and any need for assistive devices.
- Activity Tolerance: Monitor vital signs (heart rate, blood pressure, respiratory rate, O2 saturation) before, during, and immediately after activity. Signs of intolerance include significant changes in vitals, shortness of breath, dizziness, or chest pain.
Memory Aid: The "MOVE" Mobility Assessment
For a quick yet comprehensive bedside assessment, remember the MOVE mnemonic:
- M – Muscle Strength & Tone: Assess strength against resistance and check for flaccidity or spasticity.
- O – Observed Movement & Gait: Watch the patient transfer, sit, stand, and walk. Note their balance and coordination.
- V – Verbalization of Pain/Discomfort: Always ask about pain before, during, and after movement.
- E – Extent of Range of Motion: Check key joints for limitations in active or passive movement.
2.2 Step 2 & 3: Diagnosis and Planning
After analyzing your assessment data, you formulate a nursing diagnosis and create a patient-centered care plan. This step translates your findings into actionable goals.
Nursing Diagnoses and Goal Setting
- Common Nursing Diagnoses: Based on your assessment, you might identify diagnoses such as:
- Impaired Physical Mobility related to pain and muscle weakness.
- Activity Intolerance related to respiratory compromise.
- Risk for Injury related to unsteady gait and orthostatic hypotension.
- Risk for Impaired Skin Integrity related to inability to reposition independently (Nurseslabs).
- Setting SMART Goals: Your planning should involve creating goals that are Specific, Measurable, Achievable, Relevant, and Time-bound.
- Poor Goal: "Patient will have better mobility."
- SMART Goal: "Patient will ambulate 20 meters with a walker and standby assistance from nursing staff by the end of the shift today, reporting pain less than 4/10."
2.3 Step 4: Implementation – The Core Interventions
This is where the plan is put into action. Implementation involves a range of hands-on skills, from protecting yourself with proper body mechanics to therapeutically positioning the patient and assisting with exercises and transfers.
A. Protecting the Nurse: Mastering Body Mechanics
Before you can safely move a patient, you must learn to safely move yourself. Musculoskeletal injuries are a leading cause of disability among nurses, and they are almost always preventable. The principles of body mechanics are non-negotiable rules for self-preservation.
Core Principles of Body Mechanics
According to guidelines from clinical procedure manuals, these principles should be applied to every patient handling activity (OpenTextBC):
- Wide Base of Support: Keep your feet shoulder-width apart to create a stable base.
- Lower Your Center of Gravity: Bend at your knees and hips, not at your waist. This engages your strong leg muscles instead of straining your back.
- Keep the Load Close: Hold the patient or object as close to your body as possible to minimize leverage and strain.
- Avoid Twisting: Face the direction of movement. Pivot with your feet instead of twisting your spine.
- Raise the Bed: Adjust the bed to a comfortable working height (usually waist level) to avoid stooping.
- Push, Don't Pull: It requires less energy to push an object than to pull it.
- Get Help: Assess the situation and ask for assistance or use a mechanical lift if the task exceeds your physical capacity.
B. Therapeutic Positioning: A Guide for Every Need
Repositioning a patient is not just about comfort; it's a therapeutic intervention that prevents complications and promotes physiological function. The choice of position depends on the patient's condition, treatment goals, and contraindications.
| Position | Description | Clinical Indications | Nursing Considerations |
|---|---|---|---|
| Fowler's (Semi, High) | Head of bed elevated 30-90 degrees. | Improves lung expansion, reduces aspiration risk during feeding, facilitates breathing in patients with dyspnea. | Monitor for sacral pressure. Avoid overly large pillows that cause neck flexion (Nurseslabs). |
| Supine (Dorsal Recumbent) | Lying flat on the back. | Post-operative recovery (especially spinal), physical examinations. | High risk for pressure injuries on heels and sacrum. Use pillows to support lumbar curve and prevent foot drop. |
| Prone | Lying on the abdomen, head turned to the side. | Improves oxygenation in ARDS, promotes drainage of oral secretions, relieves pressure on back and sacrum. | Ensure airway is clear. Contraindicated in patients with spinal injuries. |
| Lateral (Side-Lying) | Lying on the side, with pillows supporting back, upper arm, and leg. | Relieves pressure on the sacrum and heels. A 30-degree lateral position is recommended for pressure injury prevention. | Ensure proper alignment of the spine. |
| Sims' Position | Semi-prone position, lying on the left side with right hip and knee flexed. | Administration of enemas, rectal examinations. | Allows for optimal exposure of the rectal area. |
| Trendelenburg | Head of bed lowered, foot of bed raised. | Used for postural drainage and, historically, for hypotension to promote venous return (use with caution). | Can increase intracranial pressure and compromise respiration. Use for short durations only. |
C. Range of Motion (ROM) Exercises: Maintaining Joint Function
ROM exercises are essential for preventing joint stiffness, contractures, and muscle shortening in immobile patients. The type of exercise depends on the patient's ability to participate.
- Passive ROM (PROM): The nurse or therapist moves the patient's joints through their full range of motion. This is indicated for patients who are paralyzed, unconscious, or too weak to move on their own. The goal is to maintain joint flexibility, not to build muscle (Movement for Life).
- Active-Assistive ROM (AAROM): The patient performs the exercises with some help from the nurse. This is for patients who have some muscle strength but cannot complete the full movement independently. It encourages patient participation and begins the process of muscle strengthening.
- Active ROM (AROM): The patient moves their own joints independently through the full range of motion. The nurse's role is to instruct, encourage, and monitor for correct technique.
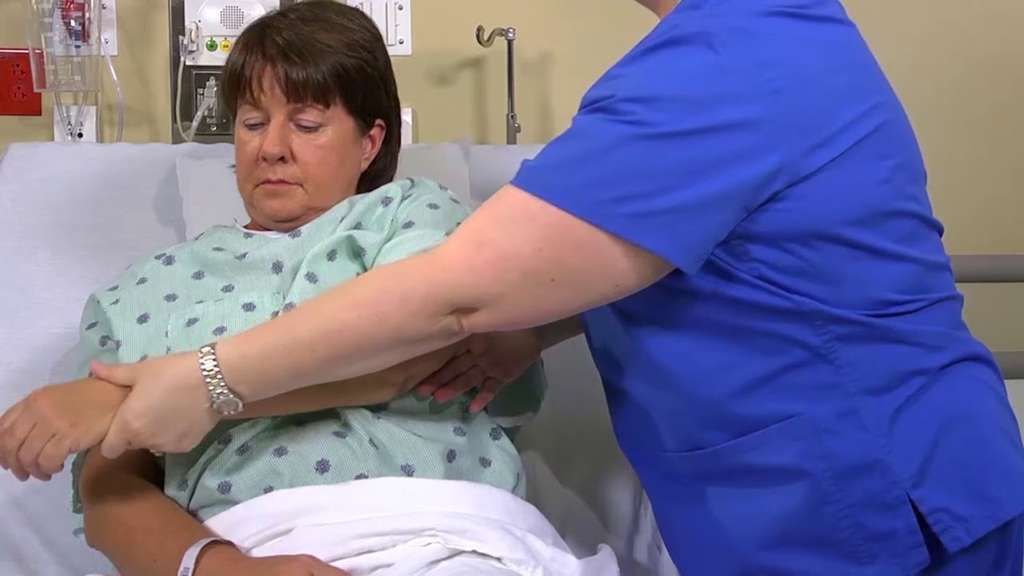
Technique Example (Shoulder Flexion – Passive):
- Support the patient's arm at the elbow and wrist.
- Keeping the patient's elbow straight, gently and slowly raise their arm forward and upward toward their head as far as it will comfortably go.
- Slowly lower the arm back to the patient's side.
- Repeat 5-10 times, as tolerated. Never force a joint past the point of resistance or pain.
D. Muscle Strengthening Exercises: Rebuilding Power
To combat the rapid muscle atrophy that accompanies bed rest, simple strengthening exercises are crucial. These exercises help maintain the muscle tone necessary for transfers, ambulation, and performing activities of daily living (ADLs).
- Isometric Exercises (Static): These involve tensing a muscle without moving the joint. They are ideal for patients who are very weak or have joint restrictions.
- Gluteal Sets: Squeeze the buttocks together, hold for 5 seconds, and relax.
- Quadriceps Sets: While lying down, press the back of the knee into the bed, tightening the thigh muscle. Hold for 5 seconds and relax (North Tees and Hartlepool NHS).
- Dynamic Exercises (Active): These involve joint movement and are used as the patient gains strength.
- Ankle Pumps: Point the toes up toward the head, then down toward the foot of the bed. This also helps prevent DVT.
- Bridging: Lie on the back with knees bent. Lift the hips off the bed, hold for a few seconds, and lower slowly. This strengthens the glutes and core (Mayo Clinic).
E. Safe Patient Transfers & Ambulation
Moving a patient from one surface to another (e.g., bed to chair) is a high-risk activity that requires careful planning and execution. The primary goal is safety for both patient and nurse.
Decision Tree: Choosing the Right Transfer Method
Before any transfer, perform a mobility assessment. The choice of method depends on the patient's ability.
- Assess Patient: Can the patient bear full or partial weight on their legs?
- YES, and is cooperative:
- Perform a 1-person or 2-person pivot transfer. Use a gait belt for safety.
- YES, but is not cooperative or has poor balance:
- Use a stand-assist lift. This provides support while allowing the patient to bear some weight.
- NO, cannot bear weight:
- Can the patient assist with their upper body?
- Use a slider board with the assistance of 2-3 staff members.
- Is the patient fully dependent?
- Use a full-body mechanical lift (e.g., Hoyer lift) with two trained staff members. This is the safest method for both patient and staff (OSHA).
- Can the patient assist with their upper body?
- YES, and is cooperative:
Step-by-Step Pivot Transfer (Bed to Chair):
- Prepare: Explain the procedure to the patient. Place the wheelchair parallel to the bed on the patient's stronger side. Lock the brakes and move footrests out of the way.
- Position Patient: Assist the patient to a sitting position on the edge of the bed. Allow them to sit for a moment to avoid dizziness. Ensure their feet are flat on the floor.
- Apply Gait Belt: Secure a gait belt snugly around the patient's waist.
- Position Yourself: Stand in front of the patient with a wide base of support. Bend your knees and hips. Have the patient place their hands on the bed or your shoulders (never around your neck).
- Lift and Pivot: On the count of three, instruct the patient to push off the bed as you lift using your legs, holding the gait belt. Pivot your feet toward the chair.
- Lower: As the back of the patient's legs touch the chair, have them reach for the armrests. Lower them slowly into the chair by bending your knees and hips (MedlinePlus).
2.4 Step 5: Evaluation
Evaluation is the continuous process of determining if your interventions are working. It closes the loop of the nursing process and informs future planning.
- Re-assess: Compare the patient's current mobility status to the goals you set. Did they ambulate 20 meters? Was their pain managed?
- Seek Feedback: Ask the patient, "How did that feel?" or "Do you feel steady on your feet?"
- Document: Chart the specific intervention (e.g., "Transferred from bed to chair via pivot transfer with gait belt and assist of 1"), the patient's level of assistance, their tolerance of the activity, and any adverse events.
- Modify the Plan: If goals are not met, re-evaluate the plan. Does the patient need more pain medication? Is a different transfer device required?
Part 3: Advanced Applications and Special Considerations
This section elevates your understanding by applying foundational knowledge to complex clinical scenarios. It focuses on the nuanced care required for specific conditions and challenges you to use the clinical judgment model, a key component of the NCLEX exam.
3.1 Care of Patients with Casts and Splints
A cast or splint immobilizes a fracture, but it also creates significant risks for neurovascular compromise and skin breakdown. Vigilant nursing assessment and care are paramount.
Key Principles of Cast Care
- Neurovascular Assessment: This is the highest priority. Regularly check the extremity distal to the cast for circulation, sensation, and motion.
- Positioning: For the first 24-72 hours, elevate the casted limb on pillows above the level of the heart to reduce swelling (OrthoInfo – AAOS).
- Handling: Use the palms of your hands, not your fingertips, to handle a wet plaster cast to avoid creating pressure points.
- Patient Education: Instruct the patient to:
- Keep the cast clean and dry.
- Never stick any objects inside the cast to scratch an itch.
- Report any warning signs immediately.
Memory Aid: The "5 P's" of Neurovascular Assessment
When assessing a casted limb, be alert for the "5 P's," which can signal compartment syndrome—a medical emergency.
- P – Pain: Severe pain that is out of proportion to the injury and unrelieved by analgesics.
- P – Pallor: Pale, cool, or dusky skin compared to the other limb.
- P – Pulselessness: A diminished or absent distal pulse.
- P – Paresthesia: Numbness, tingling, or a "pins and needles" sensation.
- P – Paralysis: Inability to move the distal digits (fingers or toes).
3.2 NCLEX-Style Case Study: Clinical Judgment in Action
Let's apply your knowledge using the NCSBN Clinical Judgment Measurement Model. This model structures the critical thinking process nurses use to make safe decisions.
Scenario: Mr. David Chen, a 78-year-old male, is 2 days post-operative from a right total hip arthroplasty (THA). His medical history includes COPD and mild dementia. The surgeon's order is "Transfer to chair with assistance three times daily, maintain hip precautions." During your morning assessment, Mr. Chen reports his pain is 6/10. He appears anxious and says, "I'm afraid I'll fall or hurt my new hip."
Applying the Clinical Judgment Model
- Layer 1: Recognize Cues (What matters most?)
- 78 years old, post-op day 2 THA
- History of COPD and mild dementia
- Pain level 6/10
- Patient verbalizes fear of falling and re-injury
- Order: Transfer to chair, maintain hip precautions
- Layer 2: Analyze Cues & Prioritize Hypotheses (What could it mean?)
- The pain is significant and is a barrier to mobility.
- Fear and anxiety are also major barriers.
- Dementia may affect his ability to understand and follow instructions, especially hip precautions.
- COPD increases risk for activity intolerance and post-op respiratory complications.
- Priority Hypotheses: 1) Acute Pain, 2) Fear/Anxiety, 3) High Risk for Injury (fall, dislocation).
- Layer 3: Generate Solutions (What can I do?)
- Administer prescribed PRN analgesic before attempting to move.
- Provide clear, simple, step-by-step instructions, reinforcing hip precautions.
- Use a therapeutic, reassuring approach to address his fear.
- Assess his ability to assist and determine the safest transfer method (e.g., 1-person vs. 2-person pivot, stand-assist lift).
- Ensure all equipment (walker, chair) is properly positioned before starting.
- Layer 4: Take Action (What will I do?)
- Administer the ordered PRN pain medication. Return in 30-45 minutes to re-assess pain.
- Verbally and physically demonstrate hip precautions (no bending past 90 degrees, no crossing legs, no twisting leg inward).
- Based on his strength and cooperation after pain medication, decide to perform a 2-person pivot transfer for maximum safety.
- During the transfer, one nurse manages the gait belt and pivot while the second nurse guides the walker and operated leg, ensuring precautions are maintained.
- Layer 5: Evaluate Outcomes (Did it work?)
- Was the patient transferred safely to the chair without a breach in hip precautions?
- What is his reported pain level now that he is sitting in the chair?
- How did he tolerate the activity (vital signs, breathing effort)?
- Does he appear less anxious? Document his response and modify the plan for the next transfer if needed.
Conclusion: Integrating Mobility into Holistic Nursing Care
The principles and practices of mobility and body alignment are not isolated skills; they are woven into the very fabric of holistic nursing care. Each time you reposition a patient to prevent a pressure injury, you are also promoting lung expansion. Each time you assist a patient with ambulation, you are not only strengthening their muscles but also boosting their confidence and combating depression. Safe practice, grounded in a solid understanding of body mechanics, protects your own career and well-being, ensuring you can continue to provide care for years to come.
As you progress in your studies and into your professional career, view mobility as a dynamic and essential component of patient advocacy. It is a powerful therapeutic tool that requires critical thinking, compassion, and skill. By mastering these competencies, you empower your patients to regain their independence and affirm your role as a knowledgeable and indispensable member of the healthcare team.