
Complete Guide to Parenteral Drug Administration
Master injection techniques for nursing excellence
Designed for Nursing Students & Healthcare Professionals
Table of Contents
Comprehensive overview of parenteral injection routes and anatomical sites
Introduction to Parenteral Drug Administration
Parenteral drug administration represents one of the most critical skills in nursing practice, involving the delivery of medications through routes that bypass the gastrointestinal system. The term “parenteral” originates from Greek words meaning “beside the intestine,” emphasizing the fundamental concept of avoiding oral medication pathways. This comprehensive approach to drug delivery encompasses four primary injection routes: intramuscular, intravenous, subcutaneous, and intradermal administrations.
Why Master Parenteral Administration?
Understanding injection techniques is essential because parenteral routes often provide faster therapeutic effects, precise dosage control, and alternative pathways when oral administration is contraindicated. Each injection route serves specific clinical purposes and requires distinct anatomical knowledge, technical skills, and safety considerations.
Modern healthcare demands that nursing professionals demonstrate competency in selecting appropriate injection sites, understanding the advantages and disadvantages of each route, and recognizing indications and contraindications for different parenteral methods. This knowledge foundation enables safe, effective medication administration while minimizing patient discomfort and potential complications.
Fundamentals and Key Concepts
Absorption Mechanisms
- Intramuscular: Systemic circulation via muscle capillaries
- Intravenous: Direct entry into bloodstream
- Subcutaneous: Absorption through fat tissue
- Intradermal: Local tissue reaction and testing
Universal Precautions
- Sterile technique maintenance
- Proper hand hygiene protocols
- Patient identification verification
- Needle safety considerations
Memory Aid: “SAFE INJECTION”
S – Site selection and assessment
A – Aseptic technique maintained
F – Fluid compatibility checked
E – Equipment preparation complete
I – Identification of patient verified
N – Needle angle and depth correct
J – Jabbing motion avoided
E – Evaluation post-injection
C – Complications monitored
T – Time of administration recorded
I – Initial response observed
O – Ongoing assessment planned
N – Notes documented thoroughly
Needle Selection Guide
| Route | Gauge | Length | Volume Range |
|---|---|---|---|
| Intramuscular | 18-25 gauge | 1-1.5 inches | 0.5-3 mL |
| Intravenous | 18-24 gauge | 1-2 inches | Variable |
| Subcutaneous | 25-27 gauge | 0.5-0.625 inches | 0.5-1 mL |
| Intradermal | 26-27 gauge | 0.25-0.5 inches | 0.1 mL |
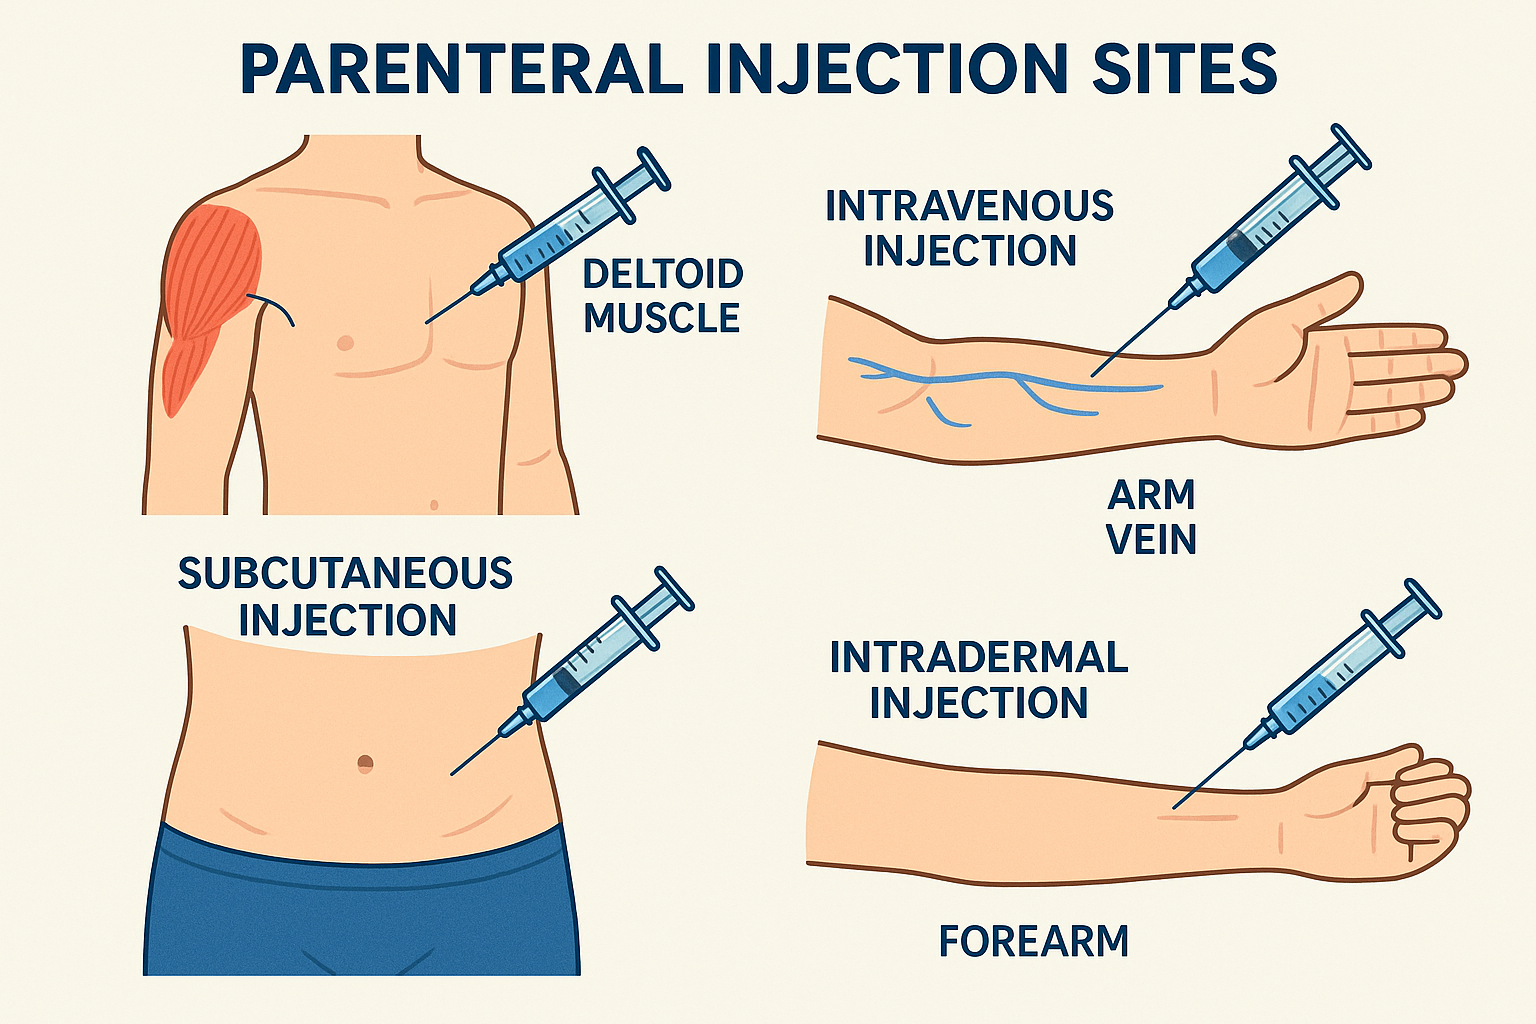
Intramuscular Injection (IM)
Anatomical Sites
Deltoid Muscle
Location: Upper arm, triangular muscle covering shoulder joint
Landmarks: 2-3 finger widths below acromion process
Volume Limit: 1 mL maximum
Vastus Lateralis
Location: Lateral thigh, middle third
Landmarks: Midway between greater trochanter and lateral femoral condyle
Volume Limit: 3 mL maximum
Ventrogluteal
Location: Hip area, gluteus medius and minimus
Landmarks: Palm on greater trochanter, fingers pointing toward head
Volume Limit: 3 mL maximum
Dorsogluteal
Location: Upper outer quadrant of buttock
Landmarks: Divide buttock into quadrants, use upper outer
Volume Limit: 4 mL maximum (adults)
Clinical Considerations
Advantages
Disadvantages
Indications
- Vaccines and immunizations
- Antibiotics requiring deep tissue penetration
- Hormonal therapies
- Emergency medications
- Depot preparations
- Patient unable to take oral medication
Contraindications
- Severe coagulation disorders
- Infection at injection site
- Severe muscle atrophy
- Previous adverse reactions
- Anticoagulant therapy (relative)
- Peripheral vascular disease
Intravenous Injection (IV)
Venous Access Sites
Peripheral Veins
Primary Sites: Cephalic, basilic, and median cubital veins
Secondary Sites: Hand and forearm veins
Selection Criteria: Straight, stable, palpable veins away from joints
Central Venous Access
Location: Large central veins (jugular, subclavian, femoral)
Devices: Central lines, PICC lines, ports
Purpose: Long-term access, irritating medications, high volumes
IV Administration Methods
Direct IV Push
Method: Direct injection into vein or IV line
Rate: Usually slow, 1 mL per minute unless specified
IV Piggyback (IVPB)
Method: Secondary infusion through primary IV line
Duration: 15 minutes to several hours
Continuous Infusion
Method: Ongoing IV fluid administration
Control: Infusion pumps for precise rate control
Advantages
Disadvantages
Indications
- Emergency situations requiring immediate action
- Medications incompatible with other routes
- Fluid and electrolyte replacement
- Chemotherapy administration
- Cardiovascular support medications
- Patient unable to absorb via GI tract
Contraindications
- Phlebitis or thrombosis at site
- Infection at injection site
- Severe peripheral vascular disease
- Patient movement restrictions
- Previous severe reaction to IV therapy
- Inability to maintain sterile technique
Subcutaneous Injection (SC)
Preferred Sites
Abdomen
Location: Around umbilicus, avoiding 2-inch radius around navel
Advantages: Consistent absorption, large surface area
Rotation: Use different quadrants systematically
Thigh
Location: Anterior and lateral aspects of thigh
Benefits: Easy self-administration, good for children
Area: Middle third of thigh, lateral aspect
Upper Arm
Location: Posterior aspect of upper arm
Considerations: Less adipose tissue in thin patients
Technique: Pinch skin to create injection site
Upper Back
Location: Subscapular area
Usage: Alternative site when others unavailable
Access: Requires assistance for administration
Special Considerations
Subcutaneous Site Rotation: “ATLAS”
A – Abdomen (preferred for insulin)
T – Thigh (lateral and anterior)
L – Lateral upper arms
A – Alternative back sites
S – Systematic rotation pattern
Injection Technique
- Angle: 45° (thin patients) or 90° (normal/obese)
- Skin: Pinch and lift subcutaneous tissue
- Speed: Slow, steady injection
- Hold: 5-10 seconds before withdrawal
Advantages
Disadvantages
Indications
- Insulin administration
- Heparin and anticoagulants
- Growth hormone therapy
- Epinephrine auto-injectors
- Allergy medications
- Long-term medication therapy
Contraindications
- Infection or inflammation at site
- Severe edema or dehydration
- Poor circulation at injection site
- Previous severe local reactions
- Insufficient subcutaneous tissue
- Scar tissue or lipodystrophy
Intradermal Injection (ID)
Anatomical Sites
Forearm (Volar Surface)
Location: Inner forearm, 3-4 inches below elbow
Advantages: Easily accessible, minimal hair
Reading: Easy visualization for test results
Upper Chest
Location: Below clavicle area
Usage: Alternative when forearm unavailable
Considerations: Avoid areas with hair or scars
Upper Back
Location: Subscapular region
Application: Multiple allergy testing
Space: Allows for multiple injections with proper spacing
Technique Specifics
Injection Process
Critical Success Factors
- Wheal formation confirms proper depth
- Do not massage injection site
- Maintain consistent needle angle
- Monitor for immediate reactions
Advantages
Disadvantages
Indications
- Tuberculosis skin testing (TST)
- Allergy skin testing
- Local anesthesia infiltration
- Immunologic testing procedures
- Small volume vaccine administration
- Research and diagnostic procedures
Contraindications
- Skin lesions or infections at site
- Previous severe allergic reactions
- Extensive scar tissue
- Active dermatitis or eczema
- Immunosuppressed patients (for testing)
- Areas with excessive hair or tattoos
Comparative Analysis of Injection Routes
| Characteristic | Intramuscular | Intravenous | Subcutaneous | Intradermal |
|---|---|---|---|---|
| Absorption Rate | Moderate to Fast | Immediate | Slow to Moderate | Very Slow/Local |
| Maximum Volume | 1-4 mL | Unlimited | 0.5-1 mL | 0.1 mL |
| Pain Level | Moderate | Variable | Minimal | Mild |
| Self-Administration | Difficult | No | Yes | Possible |
| Skill Level Required | Intermediate | Advanced | Basic | Intermediate |
| Infection Risk | Moderate | High | Low | Low |
| Cost | Moderate | High | Low | Low |
Onset Time Comparison
Route Selection Factors
- Urgency of therapeutic effect needed
- Drug properties and compatibility
- Volume of medication to be administered
- Patient condition and cooperation level
- Available injection sites
- Risk-benefit assessment
Injection Route Decision Framework
Global Best Practices in Parenteral Administration
United States – CDC Guidelines
The Centers for Disease Control and Prevention emphasizes the “One and Only Campaign” promoting single-use injection practices. Key practices include using single-dose vials when possible, never reusing syringes or needles, and maintaining strict aseptic technique. The CDC also advocates for safer injection devices with built-in safety features to prevent needlestick injuries.
- Mandatory use of safety-engineered injection devices
- Standardized hand hygiene protocols before and after injections
- Single-use policy for all injection equipment
Canada – Public Health Agency Standards
Health Canada has implemented comprehensive injection safety protocols emphasizing proper site rotation for chronic conditions like diabetes. Canadian healthcare institutions follow strict vaccine administration guidelines that include detailed documentation requirements and adverse event monitoring systems.
- Mandatory injection site rotation education for patients
- Comprehensive adverse event reporting systems
- Standardized cold chain management for vaccines
United Kingdom – NHS Innovation
The National Health Service has pioneered the use of pre-filled syringes and auto-injectors to reduce medication errors and improve patient safety. The NHS also implements comprehensive training programs for healthcare workers on injection techniques and emphasizes patient education for self-administration.
- Widespread adoption of pre-filled injection systems
- Mandatory competency assessments for injection administration
- Patient education programs for home injection therapy
Japan – Technology Integration
Japanese healthcare facilities have integrated advanced technology including smart injection pens with dose tracking capabilities and electronic health records that automatically document injection administration. This approach has significantly reduced medication errors and improved patient outcomes.
- Smart injection devices with electronic tracking
- Automated documentation systems integration
- Barcode verification for medication matching
European Union – Regulatory Harmonization
The European Medicines Agency has established uniform standards for injection device approval and safety requirements across member countries. This harmonization ensures consistent quality and safety standards for parenteral drug administration throughout Europe.
- Unified safety standards for injection devices
- Cross-border healthcare worker certification recognition
- Standardized adverse event reporting across EU
Global Best Practice Mnemonic: “WORLD SAFE”
W – Wash hands thoroughly
O – One needle, one syringe policy
R – Right patient verification
L – Location site assessment
D – Documentation requirements
S – Safety devices utilization
A – Aseptic technique maintenance
F – Follow-up monitoring
E – Education and training ongoing
Key Takeaways for Nursing Excellence
Clinical Excellence
- Master all four injection routes for comprehensive patient care
- Understand anatomical considerations for safe site selection
- Recognize indications and contraindications for each route
- Maintain sterile technique throughout all procedures
Patient-Centered Care
- Minimize patient discomfort through proper technique
- Educate patients about injection procedures and expectations
- Monitor for adverse reactions and complications
- Document thoroughly for continuity of care
Remember: Safe injection practices protect both patients and healthcare providers while ensuring optimal therapeutic outcomes.
Continue Your Learning Journey
Mastery of parenteral drug administration requires continuous practice, ongoing education, and commitment to patient safety. Use this guide as a foundation for developing expertise in injection techniques that will serve you throughout your nursing career.